Where to get an electronic signature key for government services. Electronic signature (EDS) for government services – creation and receipt
Order
Using an electronic signature and the Gosuslugi portal, anyone can pay a fine, apply for maternity capital, or check debts before traveling abroad.
And the company needs to pass the 4-FSS, obtain a permit for the transportation of oversized cargo, or obtain a SEZ.
For “Government Services”, an organization will need a qualified electronic signature. A simple electronic signature is not issued to legal entities, and an unqualified electronic signature is not supported by the portal.
An individual will also need a qualified electronic signature in order to use all the capabilities of the portal.
Electronic signature of an individual for public services
- To work with State Services, a simple and qualified electronic signature is suitable for individuals. An unqualified electronic signature for the portal is useless. A simple electronic signature is issued free of charge to all users of State Services. It can be of three types: simplified, standard and confirmed.
- Depending on the level, the user's capabilities also change. Full functionality is available only to owners of a qualified electronic signature. Simplified
- you will receive after registering on the portal. To do this, you will need to indicate your first and last name, as well as your e-mail or mobile phone number. The generated “login/password” pair will become your identifier, allowing you to perform simple operations such as paying fines from the traffic police. Standard
- will be created after you indicate your SNILS and passport data in the system. This information is checked against the FMS and Pension Fund databases. If everything is ok, new features are added. Now you can make an appointment with a doctor or check your retirement account. immediately opens access to all the capabilities of the State Services website. It serves as an identifier for an individual, allowing you to register an individual entrepreneur or LLC, obtain a patent for an invention, or request official statistics from Rosstat. A qualified electronic signature for State Services is not issued free of charge; it must be issued at a certification center.
Advantages of a qualified electronic signature for an individual in State Services
| Simple electronic signature | will be created after you indicate your SNILS and passport data in the system. This information is checked against the FMS and Pension Fund databases. If everything is ok, new features are added. Now you can make an appointment with a doctor or check your retirement account. |
|---|---|
| Has no legal effect and serves only as a general identifier | Allows you to use all portal services. For example, change your registration, issue a hunting license, submit an application to the registry office or receive another government service on the portal with a 30% discount |
| Does not allow applying for legally significant documents - a license for private security activities, for educational activities, for retail trade | Allows you to refuse the services of notaries and Russian Post. A qualified electronic signature will act as your personal identifier, and electronic documents are guaranteed to arrive on time |
| Does not allow you to add branches, change information about the organization and manage it within the portal | Allows you not to enter standard data every time you apply for government services. They are already in the ES, so you will no longer make mistakes when filling out the application form |
| Unreliable because it is poorly protected from hacking and can be easily counterfeited | Allows you to register a legal entity, add branches and change the registration details of the organization |
| Allows you to use only part of the portal's capabilities | Allows you to request legally significant documents and interact with the government on behalf of the organization |
Help setting up your workplace
The presence of a qualified electronic signature, cryptographic protection tools and a properly configured workplace ensures correct work with the State Services portal.
The easiest way to install the necessary software components on your computer or laptop is to download the “Workplace Setup Wizard” from the Tensor company website.
You can obtain a qualified electronic signature at the office of Tensor or our partners in the region. The signature will be made within an hour. Or you can submit an online application, attaching scans of documents. The manager will check the application and then invite you to the office to receive an electronic signature. If you do not have time for this, we will deliver the ES by special communication.
Before setting up, make sure that the technical parameters meet the recommended ones.
Browser Microsoft Internet Explorer version 6.0 and higher.
Plugin for the State Services portal corresponding to the operating system used.
Setting up the Internet Explorer browser
- In the “Tools” menu item, select “Internet Options”, then go to the “Security” tab in the “Trusted Sites” zone.
- Click the “Nodes” button and enter gosuslugi.ru in the “Web nodes” text field.
- Uncheck the box next to “All nodes in this zone require server verification (https:)”
- After adding the site address, go to the “Other” tab.
- In the Security window, select Trusted Sites.
- In the “Security Settings - Trusted Sites Zone” tab, set the “Access to data sources outside the domain” to “Enable”.
- In “Security Settings - Trusted Sites Zone”, enable all the “ActiveX Controls and Connectivity Modules” items.
- Save the changes by confirming the action by clicking the button that appears after clicking “OK”.
- In the Privacy tab, change the level to Low, turn off pop-up blocker, and click OK.
- In the "Advanced" tab, enable "SSL 1.0" and "TLS 1.0".
After completing the above steps, the browser is ready to work.
Installation and configuration of the Public Services portal plugin
- Download the plugin by following the official link https://esia.gosuslugi.ru/sia-web/plugin/upload/Index.spr.
- Make sure that you have downloaded the plugin that matches your OS (plugins are available for Windows versions XP, Vista, 7, 8, 10, as well as systems such as Apple Mac OS X 10.8 and higher, Linux LSB .6/4.0 32-bit and 64-bit bit).
- Start the download and wait until it finishes.
- Run the plugin installation, then restart the browser.
With virtually no user interaction, the required plugin will be installed and activated. There is no need to make any additional settings.
Registration on the State Services portal
- Go to the government services portal page and complete the registration procedure by clicking on the “Personal Account - Registration” button.
- Select a registration option - for a legal entity, individual or individual entrepreneur. An individual fills out 4 points, these are “last name”, “first name”, “mobile phone”, “email”.
- Confirm your email and phone number by entering the sent code.
- In your personal account, edit your personal data.
- Enter the entered information and your identity using an electronic signature (EDS). Users also have two other confirmation options available - in person and through Russian Post.
If the identification procedure was successful, a message will appear informing you that registration has been completed and your account has been confirmed.
When choosing a confirmation method, please note that all portal features will be available only if you have an electronic signature. Therefore, it is recommended to purchase a signature from a certification center. The validity period is 1 year, which means that within 365 days you will be able to work with the portal remotely, saving yourself from personal visits to various departments.
Electronic signature does not work for government services
If the State Services portal does not see the digital signature, you must first check the signature for validity. To do this, it is better to switch to the live version of the portal at gosuslugi.ru/pgu. In the footer of the site, click on the “Reference Information” link. In the section that opens, select “Electronic signature”. Then select the appropriate verification option:
Certificate confirmation.
Checking the electronic signature in a document in PKCS#7 format.
Checking the disconnected electronic signature in PKCS#7 format.
Checking the disconnected electronic signature in PKCS#7 format using the hash function value.
Attention! To check the digital signature for State Services, you do not need to log in to your account. The check is available to unregistered users.
You can find the reason for refusal to accept a signature in the following ways:
Reason in the browser:
- Check your browser for compliance with technical parameters.
- Update the browser version, reinstall it, disable additional plugins and extensions.
- Login to the portal from another browser.
Before you start working on the government services portal, set up your workplace. The article describes step-by-step instructions for setting up a workplace.
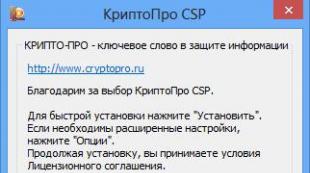
Step 1. Installation of CIPF
CIPF (cryptographic information protection tool) is a program for encrypting information. Without CIPF, an electronic signature will not work.
Download the distribution kit on the CryptoPro website in the “Support” -> “Download Center” section. The section is available after registration. Which distribution to download depends on the version and bitness of the operating system.
CryptoPro is divided by operating system versions (Windows XP, Windows 7, etc.) and their bit depth (x64/x86).
Determine the version of your operating system to download the corresponding version of CryptoPro CSP.
In the latest versions of CryptoPro, the distribution automatically detects the bit depth and installs the necessary packages.
This manual covers the most popular OS, Windows 8.
How to determine the version and bitness of the OS?
Right-click on the “Computer” icon (on different operating systems - “My Computer” or “This Computer”) and select the “Properties” context menu item.
A window with information about the operating system appeared on the screen.
Please note that the operating system Windows 8 Professional is installed on your computer. The CryptoPro CSP 3.9 distribution is suitable.
Accept the license agreement. Download the distribution.
Please note that the version of the CryptoPro CSP distribution kit matches the Windows OS.
|
OSWindows |
CryptoProCSP |
|
CryptoPro CSP 3.6 |
|
|
CryptoPro CSP 3.6 |
|
|
CryptoPro CSP 3.6 |
|
|
CryptoPro CSP 3.9 |
|
|
CryptoPro 3.9 (4.0) |
How to install the distribution?
Launch the distribution and click “Install”.
Install all software as a user with administrator rights.

The necessary packages and modules will be unpacked automatically. After installing packages and modules, a window indicating successful installation will appear.

In earlier versions of CryptoPro CSP, installation took place in several sequential steps, in which additional settings were selected and the serial number was entered. Now the installation procedure has been simplified to a minimum of steps.
The crypto protection tool has installed. The trial mode for 3 months was activated automatically. To increase the period, enter the serial number.
Order a cryptographic information protection tool
Step 2. Entering the serial number / Activating the license
To enter the serial number, go to the “Control Panel”, select the “System and Security” category, and then select the “CryptoPro CSP” program.
The “CryptoPro CSP” work area will appear on the screen.

Click the "Enter License..." button in the "License" section.
Enter your full name. user who plans to work on the computer, name of organization, serial number. It is indicated on the form of the purchased license.
Complete the license activation, click on the “OK” button.

On the “General” tab, the license validity period will change to the one specified in the license.
The work with CryptoPro CSP is finished; next time you will need CIPF to set up an electronic signature and install root certificates.
Step 3: Install a personal certificate
Go to the "Services" tab and in the "Certificates in the private key container" section, click the "View certificates in the container..." button.

A window will appear on the screen with the selection of a key container.
Click the "Browse" button to see the electronic signatures that are recorded on the secure media.

A window will appear asking you to select a key container.
If there is only one electronic signature on the medium, there will be no problems with selection.
If there are several entries and you do not know which electronic signature is needed, select the first entry in order and click “OK”. Then click the “Next” button.

Information about the selected electronic signature will open.
Have you determined that a different signature is needed? Click the Back button and choose a different signature.
Continue opening signature information until you find the one you want.

Found the signature you need? Click the "Install" button.
After successful installation of the personal certificate, a notification will appear on the screen. Click OK. The personal certificate is installed.

Purchase an electronic signature for the State Services portal
Step 4. Installing the CA root certificate
To install the root certificate of the Certification Authority, click the “Properties” button. The electronic signature certificate will open
"ASP Electronic Services" issues qualified electronic signatures from the certification center "Kaluga Astral"

On the General tab, you will see a message: “This certificate could not be verified by tracing it to a trusted certification authority.” To fix this, go to the Certification Path tab.

In the “Certification Path” section, the chain from full name is indicated. manager to the publisher (certification authority).
To install the root certificate of a certification authority, double-click on it with the left mouse button. The electronic signature certificate window will open.

Click the "Install Certificate" button.
The Certificate Import Wizard will open, click Next.
Place the cursor in the “Place all certificates in the following store” item, click the “Browse” button.

A list of stores for installing certificates will open.
Now you are building a chain of trusted certificates, so select the “Trusted Root Certification Authorities” store with the “OK” button. Then click Next.
At the final stage, click the “Finish” button.

The installation of the certificate will begin.
The operating system will warn you about installing the certificate and ask you to confirm that you are the one installing the certificate.
A security warning will appear on the screen.
The security system cannot check the Certification Center of JSC Kaluga Astral, because Microsoft (the creators of the Windows OS line) is not aware of JSC Kaluga Astral. Don't worry and agree with the installation.

After installing the root certificate, a window will appear on the screen notifying you that the installation was successful. Close it by clicking "OK".

Step 5: Setupinternet browser
Most government portals work exclusively in Internet Explorer version 8.0 or higher. This is due to two reasons:
- Internet Explorer is built into every Windows operating system.
- Not all Internet browsers support working with ActiveX components, which are needed to perform cryptographic tasks on the Internet.
Internet Explorer icon
Step 6: Configure Trusted Hosts
Add the addresses of electronic platforms to the trusted ones so that the Internet browser can run all the necessary “scripts” and modules for working with cryptography.
Launch Internet Explorer and press the Alt button on your keyboard.
An action bar will appear at the top of the browser. Click the “Tools” -> “Browser Options” button on the panel.
The Internet Options window will open. Go to the "Security" tab.

Select the Trusted Sites zone and click the Sites button.
In the “Trusted Sites” window (at the bottom of it), uncheck the “Server verification (https:) is required for all sites in the zone.”
In the line “Add the following node to the zone:” enter the portal address https://*.gosuslugi.ru. Click Add.

Step 6: Configuring ActiveX Components
After adding nodes, enable ActiveX components.
In Internet Options, on the Security tab, select the Trusted Sites zone.
At the bottom of the window, in the “Security level for this zone” section, click on the “Other” button. A window will open with security settings for trusted sites.
In the "Access to data sources outside the domain" option in the "Miscellaneous" section, place the cursor in the "Enable" item.

In the "Block pop-up windows" option in the "Miscellaneous" section, move the cursor to the "Enable" option.

At the bottom of the parameters table there is a section “ActiveX controls and connection modules”. Place the cursors in the “Enable” items for all parameters in this section. Click OK and close all open windows. Browser setup is complete.
Try logging into the government services portal. You will receive an error notification.
How to install the plugin?
To download the plugin distribution kit, follow the link: https://ds-plugin.gosuslugi.ru/plugin/upload/Index.spr plugin.
Download and install the plugin following the installation wizard.

Restart your Internet browser. Your workplace is configured, proceed to registration and/or work on the State Services portal.
Obtaining an electronic signature for an individual today is quite simple. And 5 years ago, ordinary people practically did not need it. EDS was then perceived as a tool for making business easier - with it you can sign contracts via the Internet, invoices, payments and other documents. But times are changing. And now even ordinary citizens often decide to issue an electronic digital signature to make their lives easier.
An electronic signature is an electronic signature created by encrypting a set of data. It allows you to identify the owner. Electronic signatures have become so popular due to the high level of reliability and the availability of many possibilities. For ordinary citizens, the most significant advantages are:
- The ability to send an official appeal to a government body or department via the Internet. This speeds up the application process and eliminates the need to go anywhere.
- Remote receipt of various government services. For example, for several years now the State Services portal has been implementing the ability to issue a foreign passport and other important documents using an electronic signature.
- Search and purchase of goods and services at the lowest prices. Using digital signatures, you can make purchases in virtual stores, participate in tenders and auctions.
For organizations, the list of benefits is even more comprehensive. For example, digital signature allows you to sign payment documents and other important papers, and send requests to the bank.
Types of digital signature
Today in Russia they use one of two types of digital signatures: single and multiple. Each of them has its own characteristics.
And if organizations have long appreciated digital signature and use it more and more often today, ordinary citizens still treat it with some misunderstanding. Those who decide to receive an electronic signature will be able to solve the following problems with it:
- allows you to identify the owner;
- protects the document from forgery (due to the presence of cryptographic protection);
- is confirmation that the signatory has accepted the obligations or responsibilities stated in the document.
 Electronic signatures cannot work without special keys and certificates. They are issued directly at a specialized center. Any digital signature has the following keys:
- Open. It is also called verification. It is visible to all participants in the transaction, not just the key owner. It is used to eliminate the possibility of counterfeiting. It is this key that confirms the authenticity of the electronic signature.
- Closed. It is known only to the owner of the digital signature. Its function is to directly sign documents.
In addition to the key, there is one more necessary attribute of any electronic signature. We are talking about a special certificate for the key. It may be provided to the owner in one of the following forms:
- on paper;
- on electronic media.
The certificate acts as a kind of identification document for the owner of the signature. It contains the following information:
- public key number;
- information about the owner;
- information about the center that issued the key.
Only if there is an active certificate can the digital signature be encoded. If the agreement is signed by several persons, then all of them must have an unexpired document. Otherwise, you will not be able to complete the paperwork.
The certificate is valid for 1 year. After this, it cannot be used by the owner. The signature itself with an expired certificate has no reliability. If the validity period has expired, and the owner still requires an electronic digital signature, then he needs to renew the certificate. Only after this the signature will become working again.
If a citizen has changed his last name or some other personal data, he needs to immediately renew the certificate. Otherwise it will be invalid.
Signatures are verified using special encryption tools. They are necessary to create a key and the electronic signature itself, as well as to verify them.
Digital signature for individuals
Ordinary citizens are increasingly turning to the service of producing an electronic signature. It’s not surprising, because why sit in lines or go somewhere if everything can be done remotely. To do this, you only need to have access to the Internet and a special electronic signature. Individuals can use one of the following types of digital signature:
- Unskilled. It is easy to manufacture and use. You can create it yourself at home. To do this, just use an encryption program. True, such an electronic signature does not have legal force, but it can be used within one organization or between friends, relatives, and colleagues.
- Qualified. This is already a full-fledged electronic signature, which is issued in a specialized accredited institution. It is equivalent to a regular signature and has the same force. Sometimes it is even used in courts and various municipal and state structures.
Of course, if you want to have an electronic signature equal to a regular signature, then you need to contact an accredited center. Moreover, the procedure for obtaining a document for ordinary citizens is much simpler than for legal entities. So, to complete a signature, a person will only need a Russian passport and a payment document confirming payment of the state duty (a receipt from the bank will be enough).
 To obtain an electronic signature, a person must choose a suitable certification center. It is important that the institution is accredited. Otherwise, it does not have the right to issue electronic signatures. Before sending to the center, you need to pay the state fee, get a receipt from the bank or print it out. And he will go with it, a passport and a flash drive or disk to the institution. The media will be required to record the private key on it. Next, the procedure will be performed in the following sequence:
- Contact the center. It is there that the person will ultimately receive the keys with the certificate.
- Selecting a password. You need to come up with them yourself. It is better if it is some kind of memorable password, because you cannot change it due to forgetfulness. Then the procedure for obtaining digital signature keys will have to be completed again.
- Filling out documents for issuing a public key.
- Regenerating a private key, uploading files to a disk or flash drive.
- Hand over all documents to the center employee and create passwords.
- Obtain a certificate for the issued keys.
Sometimes the procedure for obtaining an electronic signature may be slightly different. Here everything depends on the order of the center to which a person turns. A number of organizations require personal application, while others are ready to complete all documents remotely via the Internet.
Using digital signature
Some citizens may ask where they can use an electronic signature. Indeed, the use of digital signature requires special conditions. Therefore, for individuals, the Russian government has developed two systems, services and information in which can be obtained via an electronic signature:
- ESIA (Unified System of Identification and Authentication). It is a special telecommunications network through which it is possible to provide a number of state and municipal information to individuals. Working with this service is possible even with an unqualified signature. You can get relevant background information on the website.
- EPGU (Unified portal of public services). This is the largest Russian portal providing services to the country's population. But to work with this service you will need a qualified digital signature. This need is explained by the fact that legally significant operations can be carried out using the portal.
Thanks to these two services, people received remote access to various government services. The number of these services is constantly growing. So, for example, with the help of the government services portal today you can get a regular passport (repeatedly), a foreign passport, an INN, open your own individual entrepreneur, register in an apartment, register your vehicle. You can even find out about the presence of fines in the traffic police and the status of your account in the Pension Fund.
 Creating and registering an electronic digital signature requires certain costs. That is why individuals cannot receive this service for free today. If a person decides to issue an electronic signature, then he will have to allocate money from his budget for this. Costs vary across regions and centers. In general, the price varies from 2,500 to 10,000 rubles.
The final cost will depend, among other things, on the conditions under which the signature will be obtained. It is clear that if the client does not want to go to the center himself, then he needs to be prepared to pay more than if he contacted directly.
Industry trends indicate a gradual increase in demand for the service. People are increasingly resorting to using electronic digital signatures. The development of the field of cryptographic protection allows us to gradually reduce the cost of services.
Electronic digital signature– it is also an electronic signature, or digital signature is used to sign (approval) documents in electronic document management, it provides expanded opportunities and rights for its owner. Obtaining a signature may take time and effort, but many features will be available to you.
Once you have confirmed your identity, the legitimacy and originality of your signature, you will be able to certify documents remotely. Including serious documents and services will become available to you on the State Services portal. Adding your digital signature to documents is similar to how you personally sign on paper with a pen.
Electronic signature, what is its purpose and what types does it come in?
Law of April 6, 2011 No. 63 “On Electronic Signature” says that an electronic document can only have legal force if there is an electronic signature that identifies the person, and in our case, the recipient of the service.
Terminology and abbreviations:
- EDS or EP- electronic digital signature
- CA- verification Center
- NEP– unqualified electronic signature
- CEP– qualified electronic signature
Types of electronic signature:
- Simple electronic signature
- Enhanced electronic signature
A strengthened signature, in turn, is:
- reinforced unskilled electronic signature
- reinforced qualified electronic signature
Simple electronic signature– this means that an individual has a login and password to access the services. We often encounter such signatures on the Internet, and in some cases it is also necessary to enter a one-time password, which is sent to your phone number.
Unqualified electronic signature– allows you not only to identify its owner, but also to record changes in documents using it. You can obtain such an electronic signature only at a certification center. It is worth noting that the scope of application of such an electronic signature has limitations. For example, you cannot use it to sign documents that contain secrets.
Qualified electronic signature is recognized by all social institutions without exception and gives absolute legal force to an electronic document, which is similar to a paper document that contains the owner’s signature and seal.
To make it easier to distinguish them from each other, let’s draw an analogy with clear paper attributes of personal identification:
- a simple electronic signature is equivalent to a badge, if others used the PC (phone), you yourself are responsible for the consequences;
- an unqualified electronic signature is like a pass to an organization where there is an element of trust between the parties;
- a qualified electronic signature - passport, gives the right to use all services, is the most significant element of personal identification in legal transactions.
Decide for yourself what type of signature you need, but a qualified electronic signature covers all services provided on the Unified Portal, of which there are slightly less than a thousand. Therefore, further we will talk about its creation and receipt.
- Obtain information about Accredited Certification Centers.
- Choose one available to you.
- Inquire about the level of service provided and prices for services.
- Submit your application.

Some CAs have the opportunity to undergo training on using digital signatures, conducting trades, and working with various extensions documents and so on.
On the government services portal, you can submit an application to receive an electronic signature in the center you choose. It is possible to first contact the CA and then register using your existing electronic signature (for legal entities this is a prerequisite).
Regardless of the chosen option, you must obtain a qualified electronic signature from the Certification Center. Depending on the degree of secrecy of legally significant transactions, the type of digital signature is selected.
Electronic signature for individuals and legal entities
Both individuals and legal entities can create an electronic signature to work with the government services portal. The choice of electronic signature type depends on the tasks that you plan to solve using the site. But we would like to immediately warn you that working with bodies such as the Social Insurance Fund, Federal Tax Service, Pension Fund or Rosstat is only possible if you have a qualified electronic signature. You can receive an electronic signature both before and after registering on the portal.
Making a simple electronic signature for the State Services portal
To do this, open the website gosuslugi.ru and pay attention to the right column of the page that opens. This is where the links to enter the site and register are located. We are interested in the latter, so click on it.

You will need to enter your last name, first name, patronymic, your phone number and email address. You will receive a message with a confirmation code to your phone or email address. We recommend that you come up with a more complex password, since this is what you will enter every time you enter the site.
Next, you need to enter the maximum possible amount of information about yourself, so that it is then automatically entered into the necessary forms at the stage of receiving a particular service. At a minimum, you need to enter your passport details, SNILS number and Taxpayer Identification Number. You can confirm your account at the nearest Russian Post office or MFC. Only after going through all these stages can you consider that you have successfully created a simple electronic signature for working with government services.
We create a qualified electronic signature for public services
As we mentioned above, a qualified electronic signature can only be created at a certification center. A list of such centers in your region is available on the website https://e-trust.gosuslugi.ru/CA

To display only the centers of your city in the list, select its name in the “city” field and click on the “apply” button. In the list that appears, click on each of the existing centers one by one and look at their addresses. It is advisable for you to choose the one closest to you (to view, click on the magnifying glass icon in front of the center name)

It is best to call the specified contact phone number and ask all questions before visiting the center. There you can find out what documents you need to take with you. A trip to the center is inevitable, since only there you can receive a secret key with an electronic signature on a USB flash drive.
The cost of the service includes:
- issuing a certificate
- issuing a license to use the software
- USB signature media
- disk to automatically configure your computer
- consultations on emerging issues by company specialists
To obtain a qualified electronic signature, a legal entity will need the following:
- issue a power of attorney for the employee who will receive the signature
- TIN of the organization
- extract from the Unified State Register of Legal Entities
Checking if the electronic signature works
When you have received the entire set that comes along with the signature, you will need to check the functionality of the received digital signature. To do this, open the website https://www.gosuslugi.ru/pgu/eds, download the file and enter the code from the image.

If after this you see the message “The authenticity of the document is confirmed,” then everything is in order and you can start working with the portal. We would like to immediately note the fact that this electronic signature will only work with the government services portal and will not be valid on other resources. For example, you will not be able to use it on the website of the Federal Tax Service.
Programs required for electronic operation
For ES attributes to work, you need to install several programs. You can do this yourself. You will need a crypto provider Vipnet CSP and one of two programs for verifying the signature: CryptoARM or Vipnet CryptoFile.
Is the electronic signature suitable for other resources?
Unfortunately, the electronic signature key for government services will not be valid, for example, for the Federal Tax Service portal. For tax authorities, a different type of (non-)qualified signature is required. It must contain the TIN data, and sometimes the registered powers of the legal entity. Therefore, for different needs you need to purchase separate keys. This is inconvenient, but they haven’t made a universal type of signature yet.
Some craftsmen who are well versed in PCs can expand the functionality of the electronic device. To do this, you do not need to seek help from a CA and pay for additional services.
What you need to do to get an EP
To create an electronic signature for State Services, you need to complete the following steps:
- Fill out an application for a personal electronic signature on the website of the certification center of your choice and indicate the telephone number and email for contact.
- The center specialist takes the application into consideration, contacts the future owner of the signature and sends a list of documents to the email address specified in the application. Phys. persons must bring an application for a signature, their passport, INN and SNILS. When receiving an electronic signature, legal entities must provide an application, a certificate of state registration. individual entrepreneur registration, TIN, passport, SNILS and extract from the Unified State Register of Individual Entrepreneurs. Sometimes additional documents may be required. In any case, the final list of required documentation for each citizen will be sent in a letter to the email address specified in the application.
- After submitting the requested documents, the electronic signature is produced within 1 day.
Scope of application of digital signature
Citizens who own an electronic signature can use it for the following purposes:
- Apply for government services via the Internet;
- Take an active part in public initiatives;
- Make full use of online tax payment services;
- Send documents to higher educational institutions upon admission;
- Individuals can quickly apply for loans online;
- Obtain accreditation for an expert;
- Send documents for registration of individual entrepreneurs;
- Persons with individual entrepreneurs can take part in supplies for government agencies;
- Submit documents in order to obtain a patent.
How to use a digital signature
In order to use the EP, you need:
- Install a cryptographic information protection tool (CIPF) on your computer or laptop;
- Install the program for a closed flash drive (eToken, ruToken);
- Install a user digital signature certificate;
- Install the certificate of the selected CA.
Typically, using ES does not cause difficulties and does not require special knowledge.
Validity period of the digital signature
Do not forget to check the validity period of the digital signature through State Services in a timely manner. If a notification appears that you are using an invalid electronic signature tool, you must renew the certificate.
Also remember that not all organizations are yet ready to work under the new document flow program and use of digital signatures; this is not possible everywhere yet. However, this is the future.